


Using Soracom Beam to Send Data to ClearBlade IoT Core
Before getting started, you will need the following:
- A Soracom account and a registered IoT SIM
- A device with a network connection, such as a Raspberry Pi and a Soracom Onyx LTE USB dongle
- A ClearBlade account and a ClearBlade project
Step 1: Prepare ClearBlade IoT Core
Create a Registry
-
Create a registry.

! You can also use an existing registry. ! ! For more details on how to operate ClearBlade IoT Core, refer to Creating registries and devices .
-
Access the ClearBlade IoT Core console and click +ADD REGISTRY → Create Registry.
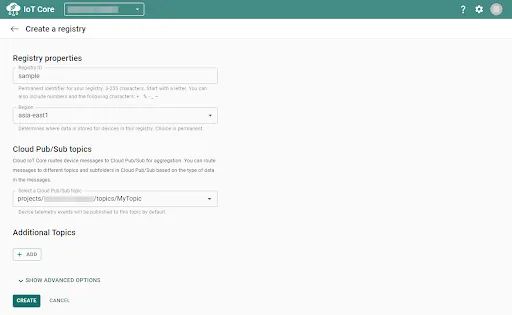
The "Create a registry" screen will appear.
Actions Description Registry properties → Registry ID Enter any Registry ID. From here onwards, it will be represented as ${registry_id}(e.g.,sample). (*1)Registry properties → Region Select a region. From here onwards, it will be represented as ${region}(e.g.,asia-east1). (*1)Cloud Pub/Sub topics → Select a Cloud Pub/Sub topic Select a Google Cloud Pub/Sub topic. To create a topic, use the Google Cloud Pub/Sub Topic screen . (*1) Cannot be changed after creation.
-
Click SHOW ADVANCED OPTIONS.
-
Set the following items.
Actions Description Protocols → MQTT Check this option. Protocols → HTTP Uncheck this option. 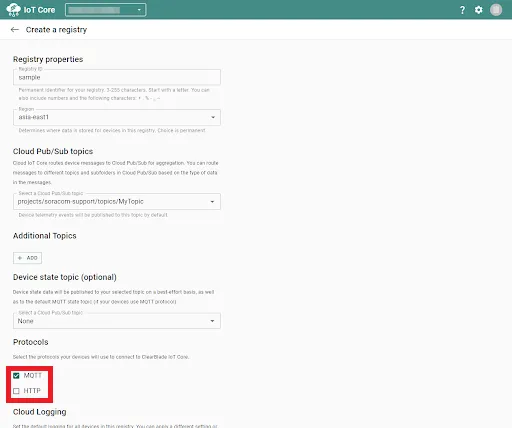
-
Click CREATE.
Create a Secret/Public Key Pair
To connect a device on ClearBlade IoT Core, you will need to create a secret/public key pair. For Beam, it supports RS256 and ES256 as encryption algorithms for the keys. Below is an example of creating a secret/public key pair using the openssl command for RS256. In the following steps, the public key (e.g., rsa_public.pem) will be uploaded to ClearBlade IoT Core, and the private key (e.g., rsa_private.pem) will be uploaded to Soracom.
-
Create the secret key.
$ openssl genpkey -algorithm RSA -out rsa_private.pem -pkeyopt rsa_keygen_bits:2048A secret key (e.g.,
rsa_private.pem) will be created. -
Create the public key.
$ openssl rsa -in rsa_private.pem -pubout -out rsa_public.pemA public key corresponding to the secret key (e.g.,
rsa_public.pem) will be created.
Upload the Public Key to ClearBlade IoT Core and Register a Device
-
Access the ClearBlade IoT Core console , then click + ADD REGISTRY to create a device.
-
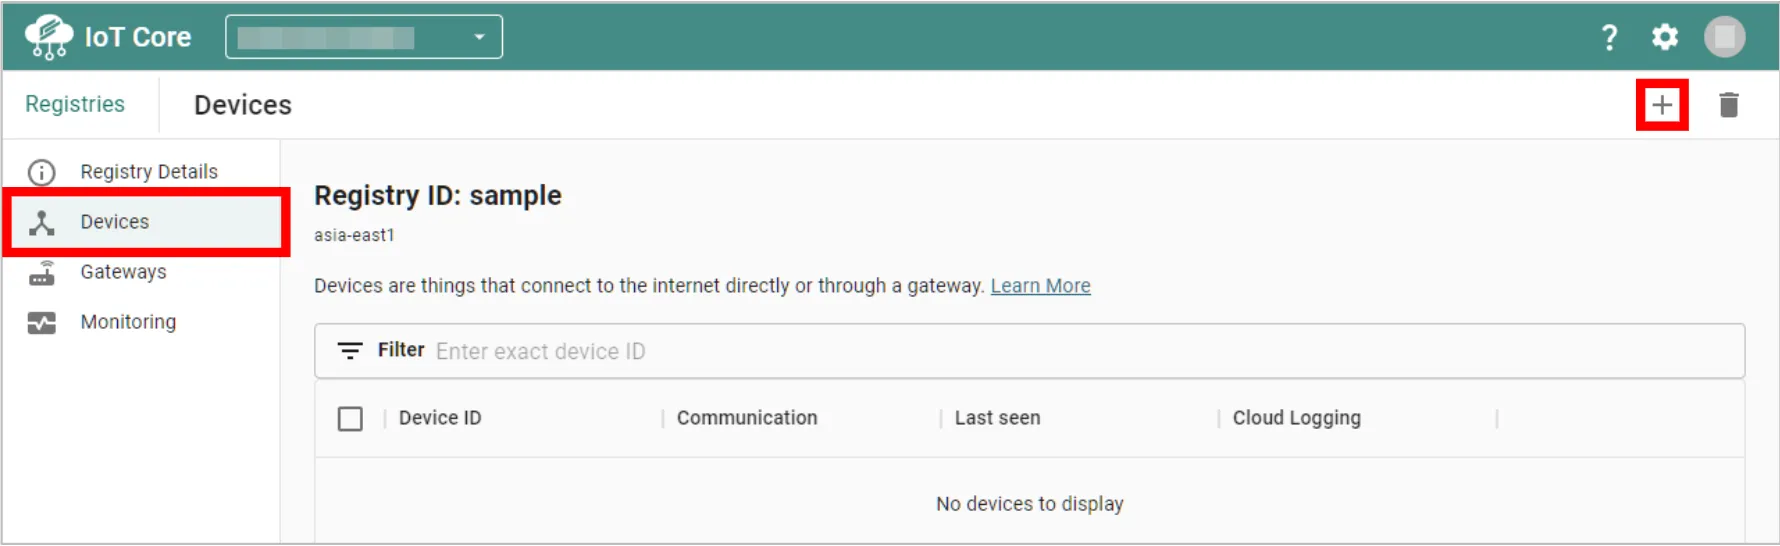
Click Devices → + in order.
-
Enter any Device ID.
The device will be represented as
${device_id}(e.g.,beam-device-01) from here onwards. -
Click COMMUNICATION, LOGGING, AUTHENTICATION.
-
Set the following items in Authentication (optional).
Item Actions Input method Select "Enter manually". Public key format Select the public key algorithm created from the pair of secret/public keys (RS256). Public key value Paste the content of the public key (e.g., rsa_public.pem) created from the secret/public key pair.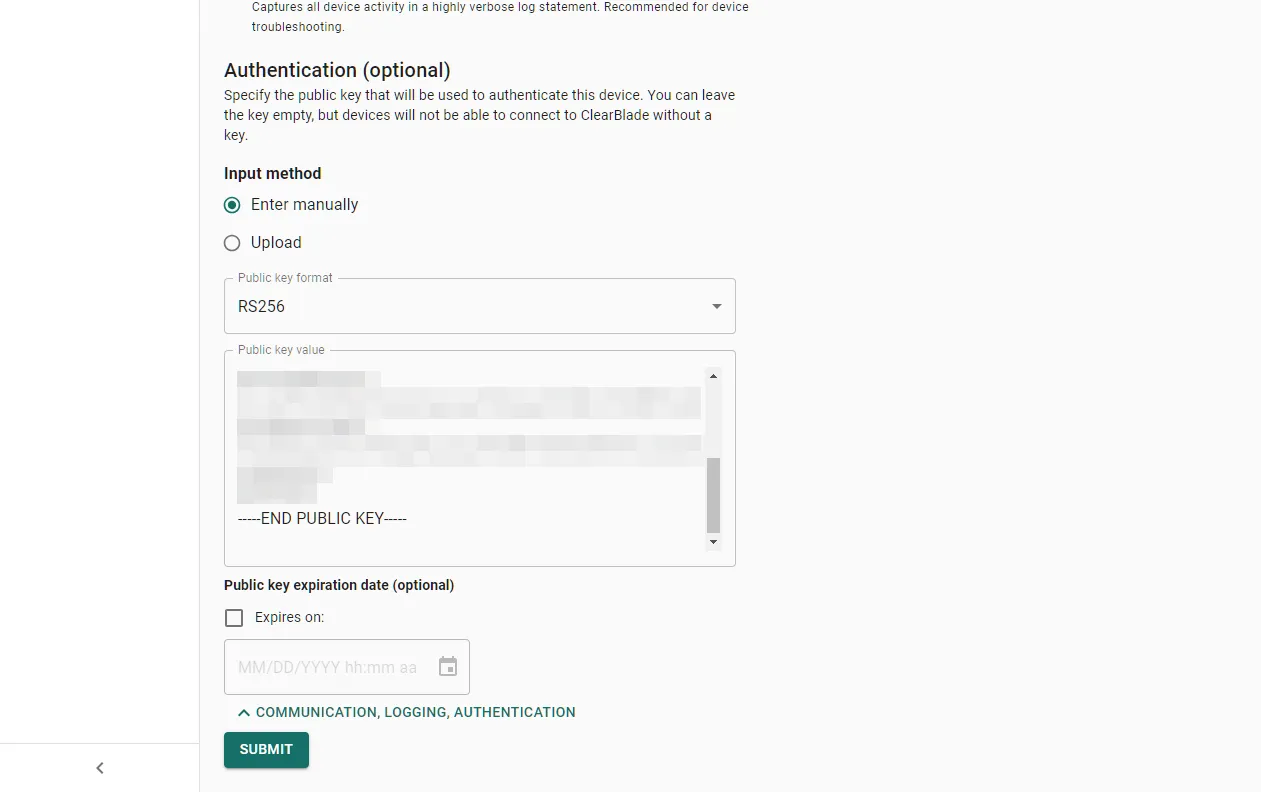
-
Click SUBMIT.
Step 2: Set up Soracom Beam
Set the MQTT entry point for Beam.
Register Authentication Information to Google Cloud IoT Core
To connect Beam with ClearBlade IoT Core, you need to register the authentication information you created earlier (secret key) in the User Console. Click on your username, Security, then CREDENTIALS. For more details on how to use authentication information storage, refer to this guide.
Enter the following information:
| Item | Actions |
|---|---|
| CONFIGURATION NAME | Enter any authentication ID. For example, Google-Cloud-IoT-Core-credential. |
| PROJECT ID | Enter project ID (e.g., sample-project). |
| REGION | Enter the region ID (e.g., asia-east1). |
| REGISTRY ID | Enter the registry ID (e.g., sample). |
| DEVICE ID | Enter the device ID (e.g., beam-device-01). |
| ALGORITHM | Select the encryption algorithm corresponding to the secret/public key pair you created (e.g., RS256). |
| PRIVATE KEY | Paste the content of the private key file (e.g., rsa_private.pem). |
Set up the MQTT Entry Point for Beam
-
In the SIM group settings, select Soracom Beam Settings.
For more details on how to configure a group in Beam, refer to Group Settings. -
Click MQTT entry point.
-
Set the following.
Item Directions CONFIGURATION NAME Insert a name of your choice PORT NUMBER 1883 HOST NAME Enter the FQDN (Fully Qualified Domain Name) of the host, e.g., asia-east1-mqtt.clearblade.com. For details on the MQTT host in ClearBlade IoT Core, refer to Retargeting devicesPORT NUMBER Enter port number 8883CREDENTIALS SET Select the authentication information you registered earlier Append IMSI to topic Disable the IMSI option PLATFORM VERSION Select the platform version 201912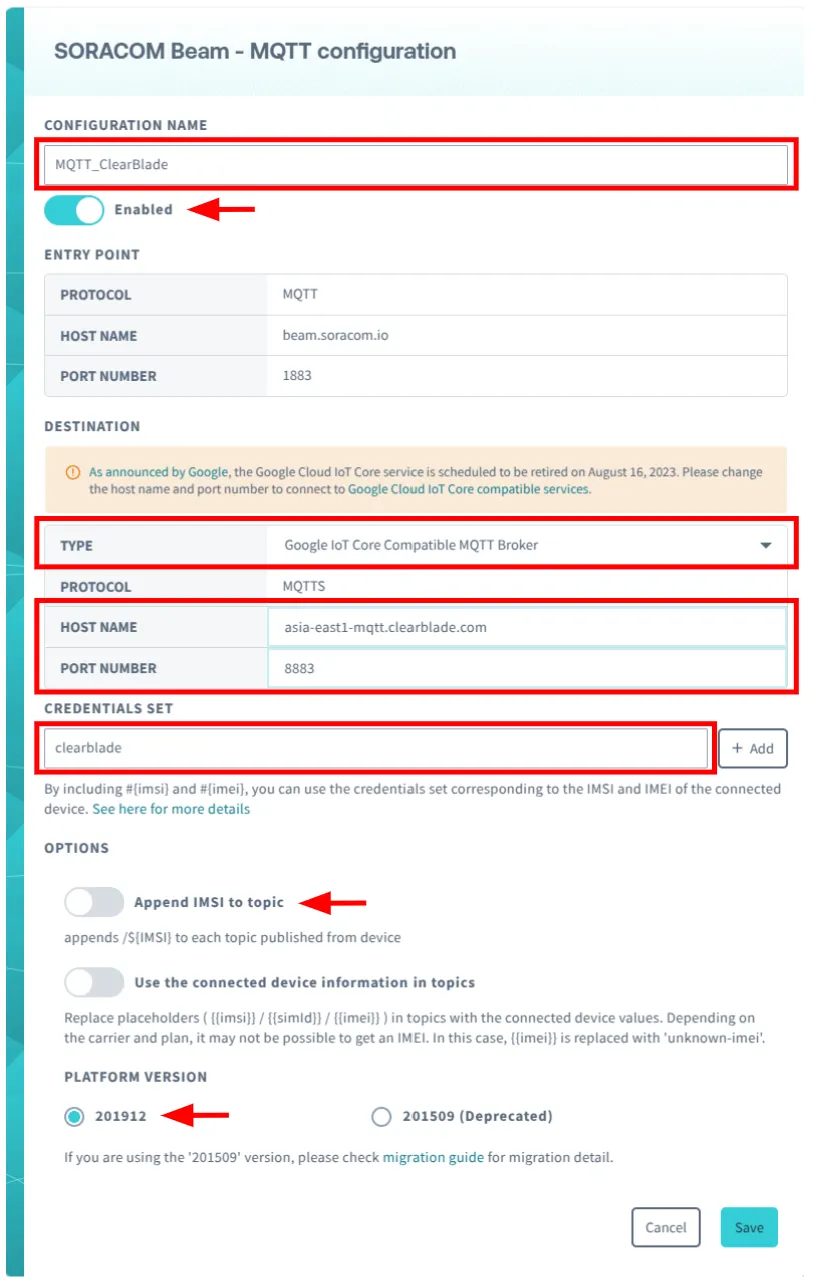
-
Click Save.
You can now configure Beam settings for your IoT SIMs.
Step 3: Send Data to ClearBlade IoT Core Using Beam
Here, we will use mosquitto_pub, an MQTT message broker provided as open-source software, to publish data.
-
Install mosquitto-clients
Download and install
mosquitto-clientshere .For Raspberry Pi, you can install it with the following command:
sudo apt install mosquitto-clientsRun the following command on a device that belongs to the IoT SIM in the group settings to send data. For example, if the Device ID is beam-device-01, the command is:
mosquitto_pub -h beam.soracom.io -t /devices/beam-device-01/events -m "Hello, World"Example output:
Client (null) sending CONNECT
Client (null) received CONNACK (0)
Client (null) sending PUBLISH (d0, q0, r0, m1, '/devices/beam-device-01/events', ... (12 bytes)
Client (null) sending DISCONNECT
The data will be sent via Beam, and it will be forwarded to ClearBlade IoT Core. Next, confirm that the data was successfully transmitted.
-
Access ClearBlade Cloud Console
Go to the console and click Registry → Telemetry Pub/Sub Topics to check the data transmission.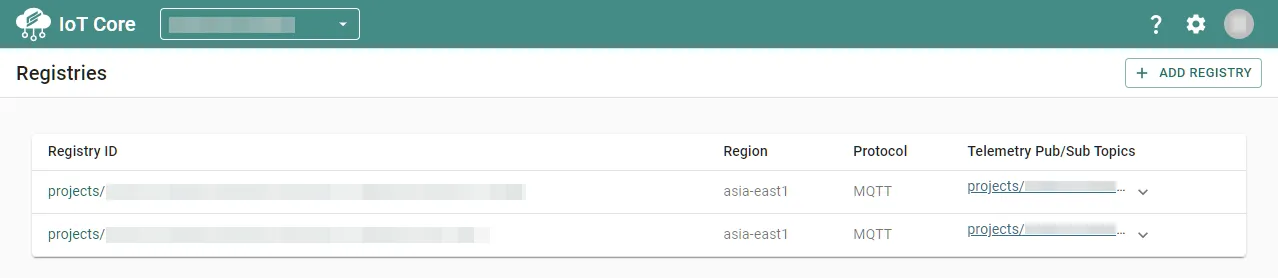
-
Google Cloud Pub/Sub will display the topic.
Click on Subscription. -
Click on Message → PULL to retrieve the sent data.
The data you sent will appear, for example:
- Device ID:
device01 - Message: "Hello, World"
- Device ID:
Step 4: Receive Data from ClearBlade IoT Core on Your Device
-
Run the following command on the device that belongs to the IoT SIM in the group settings.
For example, if the Device ID isbeam-device-01, the command is:mosquitto_sub -d -h beam.soracom.io -t /devices/beam-device-01/commands/#Example output:
Client (null) sending CONNECT Client (null) received CONNACK (0) Client (null) sending SUBSCRIBE (Mid: 1, Topic: /devices/beam-device-01/commands/#, QoS: 0) Client (null) received SUBACK Subscribed (mid: 1): 0 -
Access ClearBlade Cloud console
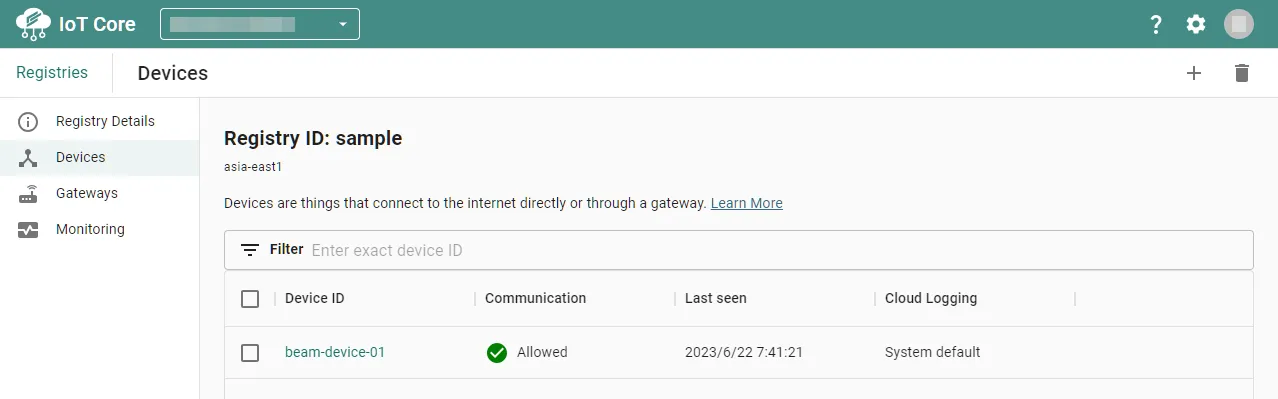
Go to the console, and click Registry to view the device. -
Click Devices → beam-device-01 and view the device details.
-
Click the ⋮ → Send command button.

-
In the Send command dialog:
- Set Format to Text.
- Enter the command in Command data, for example:
Hello!. - Click SEND COMMAND.
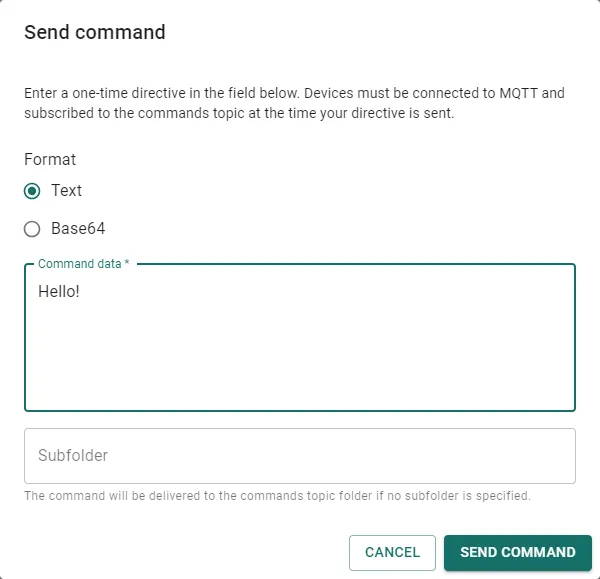
The device receives the message:
Client (null) received PUBLISH (d0, q0, r0, m0, '/devices/beam-device-01/commands', ... (6 bytes))
Hello!
If the device is not receiving messages, the following feedback will be displayed repeatedly:
Client (null) sending PINGREQ
Client (null) received PINGRESP
Client (null) sending PINGREQ
Client (null) received PINGRESP
...